- /
- Article / Step-by-Step: How to Use a Heat Seal Tester for Accurate Seal Strength Testing
Step-by-Step: How to Use a Heat Seal Tester for Accurate Seal Strength Testing

A heat seal tester is a device designed to check the durability of seals on packaging materials like plastic films, laminates, and pouches. It applies heat and pressure to create a seal, then tests how strong that bond is. Think of it as a quality gatekeeper—ensuring your packaging won’t fail when it matters most. Synonyms like seal strength tester, thermal sealing machine, or packaging seal evaluator all point to the same idea: a tool that guarantees your seals are tough enough.
Manufacturers use it to fine-tune sealing conditions—temperature, pressure, and time—so the final product can withstand real-world challenges. Ready to learn how to use it? Here’s the breakdown.
Step-by-Step Guide to Using a Heat Seal Tester
Step 1: Gather Your Equipment and Materials
Before you start, make sure you have everything on hand:
- Heat Seal Tester: Ensure it’s plugged in and functional.
- Packaging Material: Cut samples of the film, laminate, or pouch you’re testing (usually 15mm wide strips work best).
- Safety Gear: Gloves and goggles if the machine gets hot.
- Tools: Scissors or a cutter for preparing samples, and a notepad to record settings.
Check that your heat seal tester machine is clean and calibrated. Dust or leftover material on the jaws can mess up your results.
Step 2: Power Up the Machine
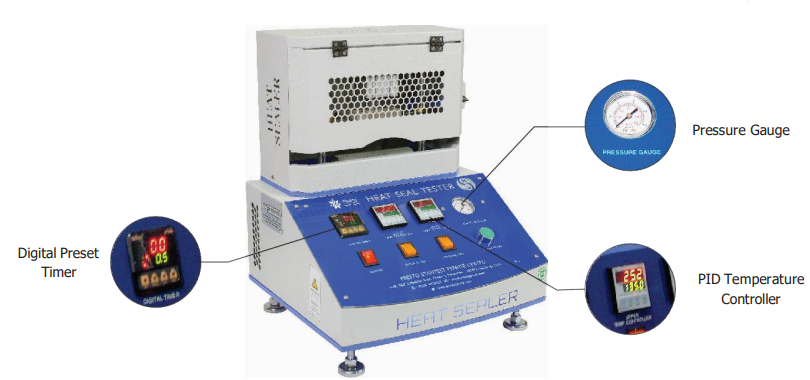
Turn on the heat seal tester by plugging it into a stable power source. Most models have a digital display that lights up, showing preset values for temperature (often labeled PV for Process Value and SV for Set Value). Give it a few minutes to warm up—patience here ensures accuracy.
Step 3: Set the Temperature
The sealing temperature is key to a strong bond. On the control panel, find the PID controller (a fancy term for the temperature regulator). Adjust the SV to your desired heat level—common ranges are ambient to 250°C, depending on your material. For example:
- Polyethylene (PE) might need 120–150°C.
- Polypropylene (PP) could require 160–180°C.
Test a few samples first if you’re unsure—too hot, and you’ll melt the material; too cool, and the seal won’t hold.
Problem: Temperature fluctuates or won’t stabilize.
Fix: Check the power supply for voltage drops. If the PID controller is faulty, call a technician to recalibrate it.
Step 4: Adjust the Pressure
Next, set the sealing pressure. This is usually controlled by a pressure gauge and regulator connected to an air source (like a compressor). Typical pressure ranges from 20 to 400 psi, depending on your tester. For thin films, start low (around 50 psi) and increase as needed.
Place your sample between the sealing jaws to test the fit. The jaws should clamp evenly without crushing the material.
Problem: Uneven pressure causes weak spots in the seal.
Fix: Inspect the jaws for wear or misalignment. Clean them with a soft cloth and tighten any loose parts.
Step 5: Set the Dwell Time
Dwell time is how long the jaws stay closed to form the seal—usually 0.5 to 5 seconds. Use the digital timer on the control panel to set this. Short times work for thin materials; thicker laminates need longer. For a leak-proof seal, 1–2 seconds is a good starting point.
Problem: Seal fails because dwell time is too short.
Fix: Increase the time by 0.5-second increments and retest until the seal holds firm.
Step 6: Place the Sample
With settings dialed in, position your packaging sample between the jaws. Make sure it’s centered and flat—no wrinkles or overlaps. Close the jaws manually or press the start button (some models have a foot pedal). The machine will apply heat and pressure based on your settings.
Step 7: Perform the Seal
Let the heat sealer do its job. You’ll hear a click or beep when the dwell time ends, and the jaws will release. Carefully remove the sealed sample—use gloves if it’s hot. Inspect it visually: a good seal looks uniform, with no gaps or burn marks.
Step 8: Test the Seal Strength
To measure seal strength, you’ll need a tensile tester (a separate machine that pulls the seal apart). Cut the sealed sample into a 15mm-wide strip, clamp it into the tester, and pull at a steady speed (like 200mm/min). Record the force it takes to break the seal—results are often in Newtons per 15mm (N/15mm). For most packaging, a strength of 1.5 N/15mm or higher is solid.
Problem: Seal strength is inconsistent across samples.
Fix: Double-check your temperature, pressure, and dwell settings. Variations in material thickness could also be the culprit—use uniform samples.
Step 9: Analyze and Adjust
Compare your results to industry standards (like ASTM F2029 for heat sealing). If the seal is too weak, tweak one variable at a time:
- Increase temperature by 5–10°C.
- Boost pressure by 10–20 psi.
- Extend dwell time by 0.5 seconds.
Retest until you hit the sweet spot. Write down the winning combo—temperature, pressure, dwell time—for future use.
Step 10: Clean and Shut Down
After testing, wipe the jaws with a dry cloth to remove residue. Turn off the machine and unplug it. Store your samples and notes in a safe spot for reference.
Why Accurate Seal Strength Testing Matters
A heat seal tester for packaging isn’t just a fancy gadget—it’s your defense against costly failures. Weak seals can lead to:
- Product leaks during transport.
- Contamination or spoilage.
- Customer complaints and returns.
By mastering this tool (or its synonyms like thermal bond checker or seal integrity tester), you ensure your packaging stands up to rough handling, temperature swings, and time. It’s about trust—trust in your process and your product.
Common Problems and Fixes
Let’s tackle a few more hiccups you might face:
Problem: Burn marks or melted spots on the seal.
Fix: Lower the temperature by 10°C and reduce dwell time slightly. The material might be too thin for your settings.
Problem: Jaws stick or won’t open smoothly.
Fix: Lubricate moving parts with a light machine oil (check the manual first). If it persists, inspect for mechanical damage.
Problem: No power or display won’t turn on.
Fix: Test the outlet with another device. If it’s the machine, check the fuse or call support.
Tips for Success
- Start Small: Test a few samples with different settings to find the baseline.
- Stay Consistent: Use the same material batch for all tests to avoid variables.
- Log Everything: Record settings and results—patterns will emerge.
- Know Your Material: Thicker laminates need more heat and time than thin films.
Why Pick Presto Stantest Pvt Ltd for Your Heat Seal Tester?
When you need top-notch testing gear, Presto Stantest Pvt Ltd is a name you can bank on. If you’re hunting for a solid Heat Seal Tester, Presto brings a pile of benefits that make it the go-to for folks making stuff in all kinds of trades. Here’s why it’s a smart move.
1. Dead-On Accuracy That Leads the Pack
Presto’s Heat Seal Testers are built with the latest tech to nail down exact and steady seal strength numbers. This is a big deal for checking flexible packaging and films—mess up here, and your product’s toast. No guesswork, just hard facts you can trust.
2. Easy Controls You’ll Get Right Off
Presto keeps it simple. The control panel and digital screen are a breeze to use, letting you tweak temperature, pressure, and time without breaking a sweat. You’ll get the same results every time—no fumbling, no frustration.
3. Tough as Nails Build
These testers are made from heavy-duty stuff that can take a beating. Whether you’re running tests non-stop in a busy shop or just now and then, Presto’s gear holds up. It’s not some flimsy toy—it’s a workhorse.
4. Customization Options:
Presto offers tailor-made solutions to suit unique testing needs, making it a go-to choice for both small-scale and large-scale manufacturers.
5. Strong After-Sales Support:
With a wide service network and expert technical support, Presto ensures that you get prompt assistance, training, and calibration whenever needed.
Choosing Presto for your Heat Seal Tester means investing in precision, durability, and trusted performance — all backed by decades of expertise in the testing industry.
Final Thoughts
Using a heat seal tester—or laboratory heat sealer, if you prefer—takes practice, but it’s worth the effort. Follow these steps, troubleshoot as you go, and you’ll get reliable, repeatable results. Strong seals mean safe products, happy customers, and a solid reputation. Whether you call it a heat sealing apparatus, thermal sealing device, or just “the tester,” it’s your key to packaging perfection.
So, grab your heat seal tester machine, cut some samples, and start testing. The strength of your seals is in your hands—literally. Got a tricky material or a stubborn machine? Experiment, adjust, and conquer. You’ve got this.
Looking for the Best Heat Seal Tester Price?
Get in touch with our experts today to receive the most competitive quote and expert guidance on choosing the right Heat Seal Tester for your needs.
Call Now: +91 9210 903 903
Email Us: info@prestogroup.com
Reliable. Accurate. Trusted by Industry Leaders.
Contact us now to get a free quote!