- /
- Blog / How to Perform Torque Tests and Calibrate a Torque Meter: Stepwise Guide
How to Perform Torque Tests and Calibrate a Torque Meter: Stepwise Guide
.png)
How to Test Torque and Calibrate Your Torque Meter: Stepwise Instructions
In industries like pharmaceuticals, precision in torque testing is absolutely critical one small mistake can lead to costly errors. Whether you are checking the torque on bottle-caps or ensuring that medical devices function reliably, knowing the correct torque testing procedure is key. This guide walks you through everything from how torque testers work to proper torque meter calibration. You’ll also get a clear, step-by-step method for using a digital torque tester or torque testing machine. With insights on standards and real-world applications in pharmaceuticals, this guide helps you stay accurate, compliant, and efficient.
What Is Torque Testing and Why Is It Essential?
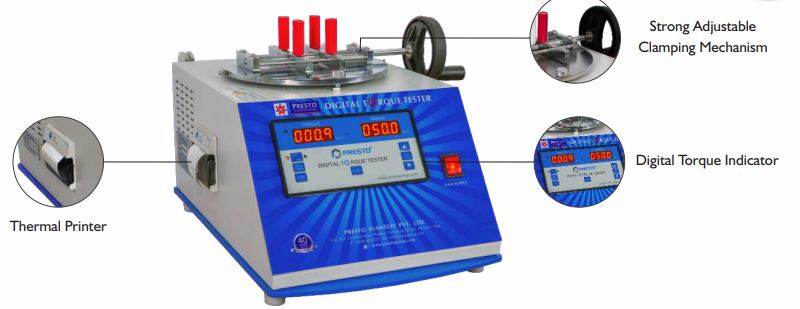
Torque testing measures the rotational force applied to secure components, like bottle caps or medical device fittings. Understanding the torque tester principle—converting mechanical twist into electrical signals—unlocks reliable torque measurement in units like inch-pounds (in-lb) or Newton-meters (Nm). A digital torque tester enhances this with real-time data, error detection, and exportable logs, making it a staple in high-stakes settings.
Why Torque Tests Matter in the Pharmaceutical Industry
In the pharmaceutical industry, improper torque can compromise safety. A loose vial cap risks contamination, while overtightening may crack glass containers. Torque test medical applications extend to devices like syringes or implants, where precise force ensures functionality. Adhering to torque test standards like ASTM D3482 or ISO 6789 (with ±5% tolerances) prevents costly recalls and ensures compliance with FDA and EMA regulations. A robust torque testing machine is your defense against production errors.
Essential Equipment for Accurate Torque Testing
Before starting, gather the right tools. A torque testing machine typically includes a transducer, display unit, and sample-specific fixtures like bottle chucks. For torque tester in pharmaceutical industry needs, choose models compliant with USP <871> standards, offering 0.1% accuracy and bidirectional testing for application and removal.
Key Tools and Safety Tips
- Digital torque tester: Opt for brands like Chatillon or Mark-10 with USB data output.
- Calibration weights: Certified standards ensure reliable readings.
- Safety gear: Use gloves and eye protection; secure benches to prevent slips.
- Environmental control: Log temperature and humidity, as they can shift torque values by 10-15%.
Step-by-Step Torque Test Procedure for Bottles and Medical Devices
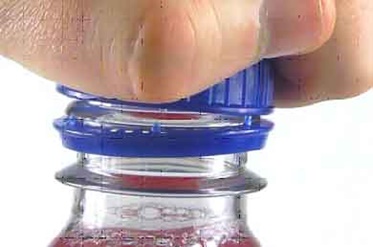
Here’s a streamlined torque test procedure tailored for torque test for bottles but adaptable for torque test medical components like syringe caps.

Step 1: Prepare Samples and Torque Tester
- Select 10-20 samples per ASTM guidelines to capture batch variability.
- Inspect for defects: No dents or thread residue.
- Zero the digital torque tester: Allow 5-10 minutes for stabilization, then tare.
- Secure samples in fixtures, ensuring no wobble for bottles or medical assemblies.
Pro tip: In torque test medical setups, sterilize fixtures to avoid contamination.
Step 2: Configure Test Parameters
- Set target torque (e.g., 10-15 in-lb for pharma bottles) per specs.
- Program high/low alarms to catch outliers.
- Choose rotation speed: 10-20 RPM for manual simulation; slower for precision.
- Follow torque test standards: Apply steady force, pausing 1-2 seconds at peak.
Step 3: Run the Application Torque Test
- Align closures squarely on bottle necks or device threads.
- Rotate clockwise at controlled speed until peak torque registers.
- Record peak values; note any cap slippage (“breakout”).
- Test all samples, rotating positions to balance asymmetries.
Watch out: Erratic torque spikes signal thread damage or poor lubrication.
Step 4: Conduct the Removal Torque Test
- Reverse to counterclockwise to mimic opening.
- Measure “removal torque” (typically 20-50% of application torque) for user-friendly access.
- Log results and compare against specs; high removal torque indicates overtightening risks.
For torque test for bottles with liquids, test empty and filled samples, as fluids can reduce torque by 10-15% due to thread lubrication.
Step 5: Analyze and Document Results
- Calculate mean and standard deviation; aim for <5% variation.
- Plot torque vs. sample number to spot trends.
- Export data to Excel or QA software for compliance tracking.
- Store records per GMP, linking to batch IDs for audits.
This 15-30-minute process ensures repeatable, compliant torque measurement.
How to Calibrate a Torque Meter for Precision
A digital torque tester can drift by 2-3% due to wear or environmental factors, making torque meter calibration essential every 6-12 months or after 10,000 cycles.
Why Calibration Is Non-Negotiable
An uncalibrated torque testing machine risks inaccurate readings, violating torque test standards and inviting regulatory penalties. In the pharmaceutical industry, calibration certificates are audit-proof documentation for ISO 13485 compliance.
Step-by-Step Torque Meter Calibration
You’ll need certified weights or a master torque device. Outsourcing to NIST-traceable labs costs $200-500 per unit.
Step 1: Set Up Calibration Tools
- Use Class A weights (5-50 in-lb) or a reference torque wrench.
- Clean the transducer with isopropyl alcohol; avoid abrasives.
- Log baseline: Run three zero checks, noting ambient conditions.
Step 2: Test with Known Torques\
- Apply a 5 in-lb weight vertically (torque = force × distance).
- Verify display matches within ±0.25% per ISO standards.
- Test at 20%, 50%, 80%, and 100% of range (e.g., up to 50 in-lb).
- Check counterclockwise for hysteresis (lag <1%).
Step 3: Adjust and Re-Test
- Adjust via software or potentiometers if readings deviate.
- Re-run cycles to confirm linearity.
- Verify bidirectional accuracy to eliminate directional bias.
Step 4: Certify and Document
- Generate a report with as-found vs. as-left values and traceability details.
- Attach a calibration sticker with expiration date.
- Store data in LIMS for pharmaceutical industry compliance.
Avoid: Overloading sensors (stay under 150% capacity) and calibrating in incorrect orientations.
Time-saver: Automated calibrators cut hours to minutes with built-in logging.
Torque Testing Applications in Pharmaceuticals and Beyond
The torque tester in pharmaceutical industry ensures closure integrity for vials, bottles, and IV bags. A torque test for bottles secures tamper-evident seals, while torque test medical verifies syringe or inhaler assemblies. A 2% torque failure rate could trigger a Class II recall, costing millions.
Beyond pharma, torque measurement applies to:
- Food/beverage: Soda caps (15-25 in-lb).
- Automotive: Lug nuts.
- Electronics: Screw assemblies.
The torque tester principle scales across industries, but pharma’s tight tolerances reflect its high stakes.
Conclusion: Master Torque Testing for Quality and Compliance
This guide equips you to ace torque tests and torque meter calibration, ensuring precision in every twist. From setting up a digital torque tester to meeting torque test standards, these steps safeguard your pharmaceutical industry operations or other applications. Consistency is king—regular testing and calibration keep you audit-ready and defect-free.
Got questions about your torque testing machine or specific standards? Drop them below. Here’s to seals that hold and processes that shine.
Recent Blogs
- How Box Compression Testing Helps E-Commerce Packaging Prevent Transit Damage
- How Durable Is Your Plastic? Insights from the ISO 180 Izod Test
- How Does the TAPPI T 494 Standard Measure Paper Tensile Strength?
- Why Is Torque Control Essential in Bottle Cap Testing?
- Precision in the Air: How Humidity Chambers Enable Reliable Lab Testing